Introduction
n8n is a powerful workflow automation tool that allows you to connect various applications and services without writing code. Whether you want to automate repetitive tasks, integrate different tools, or build complex workflows, n8n provides a flexible and scalable solution. Hosting n8n on an Oracle Ubuntu VPS can offer cost-effective and reliable performance, especially with the resources available through Oracle’s cloud infrastructure.
This guide will walk you through installing n8n on an Oracle Ubuntu VPS using Docker. We’ll cover each step in detail, explain why it’s necessary, and provide tips for troubleshooting and best practices. By the end of this tutorial, you’ll have a fully functional n8n instance running on your server, accessible through a custom subdomain.
Prerequisites
Before you begin, ensure you have the following:
- An Oracle Cloud account with a provisioned Ubuntu VPS.
- Access to your VPS via SSH.
- A domain name with access to DNS management.
- Basic knowledge of command-line operations.
Step-by-Step Installation Guide
1. Preparation: Accessing Your Oracle VPS and Installing Dependencies
First, connect to your Oracle VPS using SSH:
ssh your_username@your_server_ip
Once connected, start by updating your system to ensure all packages are up to date:
sudo apt update
sudo apt upgrade -y
Why is this necessary? Updating your system ensures that you have the latest security patches and software versions, reducing the risk of vulnerabilities and compatibility issues during installation.
Next, install the necessary dependencies for Docker:
sudo apt install apt-transport-https ca-certificates curl software-properties-common -y
These packages enable secure communication over HTTPS and allow your system to interact with Docker’s official repositories.
2. Installing Docker
Docker is a containerization platform that makes it easy to deploy applications like n8n in isolated environments. Follow these steps to install Docker:
- Add Docker’s official GPG key:
curl -fsSL
<https://download.docker.com/linux/ubuntu/gpg> | sudo gpg --dearmor -o /usr/share/keyrings/docker-archive-keyring.gpg2. Add the Docker repository to your system:
echo "deb [arch=$(dpkg --print-architecture) signed-by=/usr/share/keyrings/docker-archive-keyring.gpg] <https://download.docker.com/linux/ubuntu> $(lsb_release -cs) stable" | sudo tee /etc/apt/sources.list.d/docker.list > /dev/null3. Update your package list and install Docker:
sudo apt update sudo apt install docker-ce docker-ce-cli containerd.io -y4. Add your user to the Docker group to manage Docker without needing sudo:
sudo usermod -aG docker your_username5. Log out and back in to apply the group changes.
Troubleshooting Tip: If you encounter permission errors when running Docker commands, ensure your user is correctly added to the Docker group by running groups your_username.
3. Installing Docker Compose
Docker Compose simplifies the management of multi-container Docker applications. Install it with the following commands:
sudo curl -L "<https://github.com/docker/compose/releases/latest/download/docker-compose-$>(uname -s)-$(uname -m)" -o /usr/local/bin/docker-compose
sudo chmod +x /usr/local/bin/docker-compose
4. Setting Up n8n
Now, create a directory for n8n and set up the Docker environment:
mkdir ~/n8n
cd ~/n8n
Create a docker-compose.yml file:
nano docker-compose.yml
Paste the following content:
version: "3"
services:
  n8n:
    image: n8nio/n8n:latest
    restart: unless-stopped
    container_name: n8n
    ports:
      - 5678:5678
    environment:
      - GENERIC_TIMEZONE=Asia/Kolkata
      - N8N_DIAGNOSTICS_ENABLED=false
      - N8N_USER_MANAGEMENT_DISABLED=true
      - WEBHOOK_URL=https://n8n.yourdomain.com/
    volumes:
      - /home/ubuntu/n8n/n8n-data:/home/node/.n8n
Create the necessary directories and set the appropriate permissions:
mkdir -p ~/n8n/n8n-data
sudo chown -R 1000:1000 ~/n8n/n8n-data
Start the n8n container:
docker-compose up -d
Explanation:
restart: unless-stoppedensures that n8n automatically restarts if it crashes or if the server reboots.volumesmaps your local n8n data to the container, ensuring data persistence.
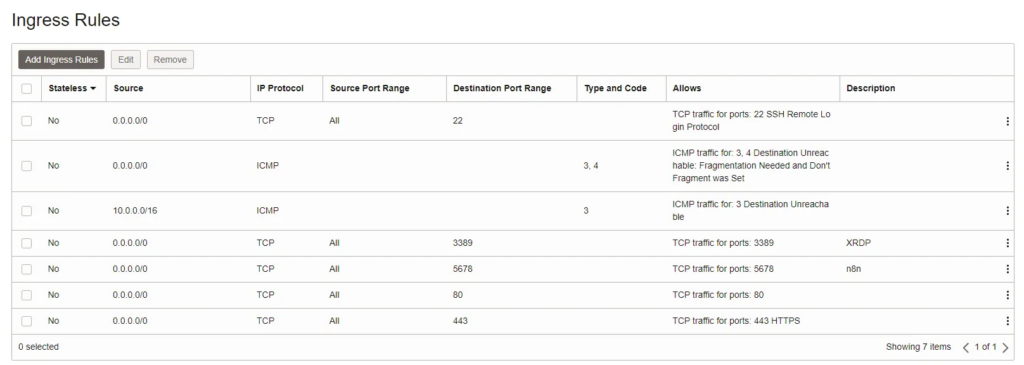
5. Configuring the Firewall
To secure your server, configure the firewall using UFW (Uncomplicated Firewall):
- Install UFW if it’s not already installed:
sudo apt install ufw -y - Allow SSH to maintain access:
sudo ufw allow ssh - Allow n8n’s port:
sudo ufw allow 5678/tcp - Enable UFW:
sudo ufw enable
Best Practice: Regularly review your firewall rules to ensure only necessary ports are open, minimizing potential attack vectors.
6. Configuring Oracle Cloud Firewall
In addition to the server’s firewall, you’ll need to configure Oracle Cloud’s network security rules:
- Log in to your Oracle Cloud Console.
- Navigate to Networking > Virtual Cloud Networks.
- Select your VCN and then your subnet.
- Click on the Security List associated with your instance.
- Add a rule to allow traffic on port 5678.
Explanation: This step ensures that external traffic can reach your n8n instance, as Oracle Cloud maintains its own security layers separate from the server’s firewall.
7. Pointing the Subdomain to Your Server
To access n8n via a subdomain, you’ll need to configure DNS:
- Log in to your domain registrar’s DNS management console.
- Create an A record pointing your subdomain (e.g.,
n8n.yourdomain.com) to your server’s IP address.

Update your firewall rules to allow HTTP and HTTPS traffic:
sudo ufw allow 80/tcp
sudo ufw allow 443/tcp
Also, update Oracle Cloud’s firewall rules to allow traffic on ports 80 and 443.
8. Setting Up HTTPS with SSL
For security, it’s essential to secure your n8n instance with SSL. We’ll use Certbot to obtain and install an SSL certificate: Reboot your server first.
- Install Certbot and Nginx plugin:
sudo apt install certbot python3-certbot-nginx -y - Obtain and install the SSL certificate:
sudo certbot --nginx -d n8n.yourdomain.com
Explanation: SSL encrypts the data exchanged between your browser and the server, protecting sensitive information.
9. Setting Up Nginx as a Reverse Proxy
Nginx will forward incoming requests to n8n, ensuring proper routing and SSL termination:
- Install Nginx:
sudo apt install nginx -y - Create a new Nginx configuration for n8n:
sudo nano /etc/nginx/sites-available/n8n
Paste the following configuration:
server {
    listen 80;
    server_name n8n.yourdomain.com;

    location / {
        proxy_pass <http://localhost:5678>;
        proxy_set_header Host $host;
        proxy_set_header X-Real-IP $remote_addr;
        proxy_set_header X-Forwarded-For $proxy_add_x_forwarded_for;
        proxy_set_header X-Forwarded-Proto $scheme;
        proxy_buffering off;
    }

    listen 443 ssl; # managed by Certbot
    ssl_certificate /etc/letsencrypt/live/n8n.yourdomain.com/fullchain.pem;
    ssl_certificate_key /etc/letsencrypt/live/n8n.yourdomain.com/privkey.pem;
}
- Remove the default Nginx configuration (optional but recommended to avoid conflicts):
sudo rm /etc/nginx/sites-enabled/default
- Enable the configuration and restart Nginx:
sudo ln -s /etc/nginx/sites-available/n8n /etc/nginx/sites-enabled/
sudo nginx -t
sudo systemctl restart nginx
10. Verifying the Installation
Finally, verify that everything is working correctly:
- Ensure the n8n container is running:
docker ps - Visit
https://n8n.yourdomain.comin your browser. You should see the n8n interface.
Troubleshooting Tip: If you’re still seeing the default Nginx page, try clearing your browser cache or using an incognito/private browsing window.
Conclusion
Congratulations! You’ve successfully installed and configured n8n on your Oracle Ubuntu VPS. By following this guide, you’ve set up a powerful automation platform that can help streamline your workflows and integrate various services.
For advanced configurations, such as setting up environment-specific workflows or integrating with additional services, refer to the official n8n documentation. Remember to regularly update your n8n instance and maintain your
Leave a Reply